Category: Tutorials
Action Sketching: Using a simple, single-line grid to develop scenic relationships
The right proportions matter more in your finished sketch than your drawing or painting skills. Bad proportions are easily recognizable and when present, are possibly the main reason why people avoid drawing. It doesn’t have to be that way.
The two types of guides I use to achieve proportional relationships are a grid app on a computer (tablet, phone, or desktop) or a proportional divider. Whether in the field or working at home, neither interferes with your drawing style, loose or tight. There only purpose is to provide relational guidance.
As an example of this technique, below is the finished sketch I began in “Action Sketching: How to draw landscapes and buildings by using a grid.”
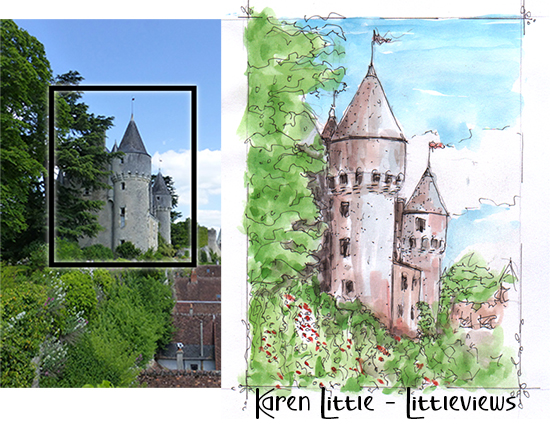
To summarize that article, a grid app creates a transparent grid to place on top of a photo.
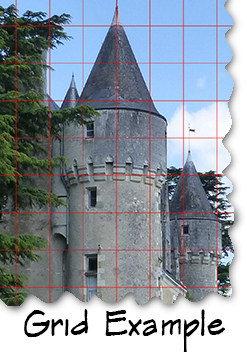
Each unit in the grid frames a small portion of the subject. Because there is less information in a grid unit than in the entire subject, reproducing a grid unit, unit-by-unit, results in a highly accurate drawing.
. . . but managing a multitude of grid units is a lot of work and is not much fun!
Single Line Technique:
A simplified version of using a grid to help sketch proportional relationships uses a grid app or a proportional divider in relationship with a single straight line.
To create a single reference line on your sketch paper, mark where you want your main subject to appear from its base to its top.

Develop a preliminary sketch as follows:
- Draw a “height” line that shows the top and bottom boundary of your main subject
- Divide the line into quarters using light tick marks, shown here as red dots.
(Note: Quarters are appropriate for most sketchbooks. Depending on subject and size, however, you might want to divide line into a greater number of equal units.)
- Using the length between the quarters as a “ruler” from tick to tick, place tick marks as needed to the left or right of those on the line, making a lightly marked grid unit.
- Roughly draft your subject relative to your tick marks.
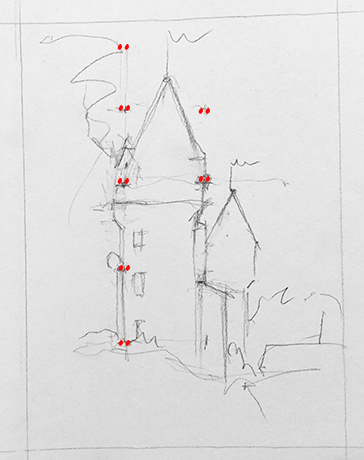
Just a few tick marks in strategic areas should give you enough information from which to establish proportional relationships in your preliminary sketch.
Keep your preliminary pencil lines light so they don’t interfere with your final composition. If they are too dark, dab them with a kneaded eraser. (Note that I boosted the line contrast in my example here so you can see them.)
You only need a few guidelines to handle proportions. After that, your eye, skill, and technique determines how your final sketch appears.
Other Proportional Marking Tools:
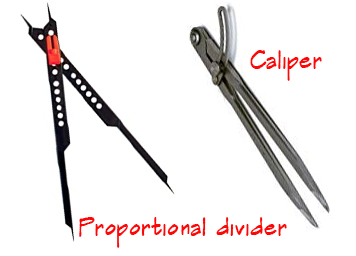
If you don’t feel comfortable using a grid app when on location, use a proportional divider to achieve the same thing. This works similarly to the artist’s “thumb” method but conveys more information.
When holding the proportional divider directly out in front of you, fit the points from one end to represent the size of the subject.
The points on the opposite side measure the related size that should appear on your paper. Use the single line method to proceed, rather than attempt to measure every small detail.
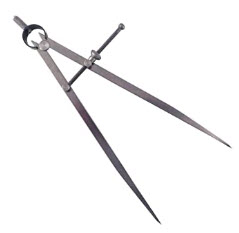
Another useful tool is a drawing caliper. In this tutorial, the distance between line quarters is used to mark related tick marks. You only need to set the distance between a caliper’s points once, then use its points to repeatedly mark new areas.
Links:
- Video: Using a thumb or pencil to determine proportions: old fashion measuring system
- Video: Proportional Divider – The Best Keep Secret to Improve Your Drawing, by Stefan Baumann
- To find a suitable grid app for your tablet or smart phone, search the app store related to your device, or else do a general search in Google on a phrase similar to “drawing grid app for a XXX,” with XXX referring to your device.
- Action Sketching: How to draw landscapes and buildings by using a grid, by Karen Little, Littleviews.com. Part 1 to this article.
Author:
This article was written by Karen Little as part of an ongoing series of blogs on Action Sketching. Published on Littleviews.com. March 1, 2020.
Reproduction of this article is free to non-commercial websites (or other media) with permission and attributes to Littleviews.com and the article’s author.
All other material on Littleviews (with noted exceptions) is copyrighted on the date of publication or as noted in credits.
Questions? Ask Karen Little at Karen@littleviews.com.
Support Our Mission:
Products sold on Sketch-Views.com contain images exclusively created for Sketch-Views gift products by designer, Karen Little. Revenues support Littleviews’ mission to provide drawing tips and events.
Cartoon Sketching: It is all in the lines. Tips on how to ink your sketches.
While many of us regard a cartoon as a funny picture, in reality, a cartoon is a line drawing where distinctions are made by the way lines are expressed.
Look closely at the illustration I made of violets (below) and you’ll see that its outline is made up of lines with irregular widths, giving added interest to a subject. Prior to computerized drawing programs, illustrations of all types were finished by professional inkers prior to publication. If it wasn’t for an inker’s work, edges of illustrations would look fuzzy or simply light gray.

To find out more about the profession of inking, Google the phrase cartoon inkers. A good overview of the subject is How To Be A Comic Book Inker. It covers commentary by famous inkers, a summary of tools, and a video on how inking is done.
Like calligraphy, practice is required, but you don’t have to memorize alphabetical styles. While hard calligraphic pens are handy, many inkers prefer to use very fine-tipped brushes because when pressure is slightly applied, variable width strokes result.
To get started, ideally you should have:
- A traditional light box, or LED tablet (which provides better visibility through paper)
- A pack of smooth Bristol paper (not vellum). Packs are available from Strathmore and Canson.
- Brushes or pens
- Buy a round, 0 and 00 fine tip brush & India Ink, or . . .
- Faber-Castel Pitt Artist Brush Pens (you will not need extra ink, which is handy, but these are harder to use than traditional brushes)
- White-out to cover inking mistakes
To trace, place a sketch on a light box, then cover it with a sheet of Bristol paper. When you turn on the box’s light, the image shows through the Bristol paper, providing the pattern to trace.
Get started tracing by using non-representative sketches, like the one below. In this way, you won’t get hung up on whether your new skill makes the underlying sketch look good. (Click HERE to acquire this 8.5 x 11 inch pattern.)

If you don’t have a light table or tablet, print several copies of the practice sheet and ink over each practice sheet’s lines.
As you become confident, learn about cross hatching such as taught by Alphonso Dunn who provides excellent free video tutorials on the subject.
In addition to developing control, also identify the inking styles you like. That style will make your drawings stand out, with the opposite of that being coloring book characters that lay flat and somewhat lifeless.
Inking is simply one of many skills involved in creating interesting drawings. Unfortunately, inking is one many sketchers ignore. Generally, ink is applied after a pencil sketch is made, but some people are so skilled at it, they skip pencil layouts altogether.
Links:
- Action Sketching: Using an LED light tablet for tracing, by Karen Little, Littleviews.com
- Google query on “How to be a comic book inker“
- How To Be A Comic Book Inker: This article that covers an overview of the craft, interviews with professional inkers, and an excellent video that capsulizes inking techniques.
- Online inking tutorials
- Alphonso Dunn – Video tutorials on pen and ink drawing
- Pen and Ink Drawing: A Simple Guide and Pen and Ink Drawing Workbook, both books by Alphonso Dunn.
Author:
This article was written by Karen Little as part of an ongoing series of blogs on Cartoon Sketching. Published on Littleviews.com. February 23, 2020.
Reproduction of this article is free to non-commercial websites (or other media) with permission and attributes to Littleviews.com and the article’s author.
All material on Littleviews (with noted exceptions) is copyrighted on the date of publication.
Questions? Ask Karen Little at Karen@littleviews.com.
Support:
Our mission is to help people learn how to sketch, love what they do, and share their sketches with others. It is supported by our gift center on Sketch-Views.com, with products like the one you see at the bottom of this page.
Action Sketching: How to draw landscapes and buildings by using a grid
While it is easy to guess at what you see when drawing landscapes or architecture, you’ll create more realistic depictions when you use modern “sighting” tools, such as a notebook computer and grid app, combined with old fashion tools, such as a caliper, divider, or just your thumb.
Using sighting tools is very common among artists on all talent levels. What is here to help you today is the use of a computer tablet (or smartphone) outfitted as follows with a:
-
- Camera
- Drawing-grid app
The following picture I took in France from a parking lot overlooking a medieval village. When on location a few years ago, I drew the castle “by eye.” I wish I had thought of this technique at that time!

My goal was to draw the castle but because of distance, I could not easily see its details and guessed at proportions. The box on the picture below marks my area of interest.

Drawing grid apps have several features, the most important of which:
-
- Move and/or change size of the picture independently of the grid itself (very important!)
- Easily change the size and shape of the grid (I like squares)
- Change the size and color of the grid lines so you can see them on your photo
- Lock the image in place so if you accidentally touch the screen (which is always an issue on a tablet), it won’t change
- See the image without the app’s controls on it
- Save your setup to your photo files
Example of Use
Here is how I should have tackled this scene had I had the right equipment.
Using your tablet (or smartphone), take a picture of the scene and bring it into a drawing grid app. Most of these apps let you take the picture from inside the app, so a two-step process is not needed.
Initially, your scene appears in its entirety, like shown below.

If needed, enlarge your image so the area of interest shows up. At this point, adjust the grid to a size that best helps you determine relationships between image elements.

I prefer square grids, so after grid size is set up, move your picture around until you find a logical presentation. For this example, I’m showing a lot of grid sections, but when I’m in the field, I use far less. The number of sections you use will depend on your drawing objectives, from highly detailed to more loosely interpreted.
When the display satisfies you, remove the grid app’s controls from sight.

I generally make preliminary sketches of complex compositions. Whether or not I use a grid, however, I always mark one set of cross centering lines (+) to help determine image relationships by quarter, rather than by the scene as a whole.
Many grid tutorials show sketchers slavishly reproducing each unit of the grid on paper, but when you get used to this method, you probably will not need that level of detail. Your final objectives determine the level of accuracy you need, and likewise, how many grid units you create for reference. (Google Search: How to Use Grids When Drawing.)
While in France, I sketched scenes like this using a simple caliper against cross centering lines to help plan relationships, resulting in a good depiction of what I saw. Using an actual grid, however, produces a more focused drawing.
Based on the photos shown here, my next article in this Action Sketching series will demonstrate ways to use a grid and caliper and why a preliminary sketch (or sketches) help you better see what you are looking at.
Drawing Grids on Tablet Computers
I own an iPad, so have access to numerous drawing grids provided through the Apple App Store. Prices range from free to $15, with many in the $10 range.
Demonstrated here was the “Drawing Grid by Brainga,” a $1 app. While it has a free trial period, you need to evaluate the “pro” version. When you click a feature that is locked, the app will prompt you to send your email in for a pass code. Do that! After the trial period, it will ask for payment. At $1, that’s very reasonable!
Note: Drawing grid apps also work on smartphones, although obviously, the image you see will be much smaller.
Links:
-
- Google Search: How to Use Grids When Drawing
- Drawing Grid by Brainga
- To find a suitable grid app for your tablet or smart phone, search the app store related to your device, or else do a general search in Google on a phrase similar to “drawing grid app for a XXX,” with XXX referring to your device.
- Action Sketching: Using a simple, single-line grid to develop scenic relationships , by Karen Little. Littleviews.com. This is Part 2 of the current article.
Author:
This article was written by Karen Little as part of an ongoing series of blogs on Action Sketching. Published on Littleviews.com. February 17, 2020.
Reproduction of this article is free to non-commercial websites (or other media) with permission and attributes to Littleviews.com and the article’s author.
The photo used in this article was taken by Karen Little on a recent trip to France and it is copyright free for your use. All other material on Littleviews (with noted exceptions) is copyrighted on the date of publication.
Questions? Ask Karen Little at karen@littleviews.com.
Support Our Mission:
Products sold on Sketch-Views.com contain images exclusively created for Sketch-Views gift products. Revenues support Littleviews’ mission to provide drawing tips and events.
Cartoon Sketching: Combining animal and human into anthropomorphic characters
![]() Learning how to draw anthropomorphic characters, which are a combination of human and animal features, is a lot of fun.
Learning how to draw anthropomorphic characters, which are a combination of human and animal features, is a lot of fun.
Because this type of cartooning really rests on your imagination more than your current drawing level skills, anyone can do it, young and old.
I was introduced to the subject by Carla Sonheim and her book, Drawing and Painting Imaginary Animals, which taught how to see imaginary characters by identifying eyeballs in surfaces like cement, tree bark, and rusty metal, then imaginating the related body. I spent a year doodling these, then branched off into creating humanized animals (or animalized humans). These are fun to create and entertain others.
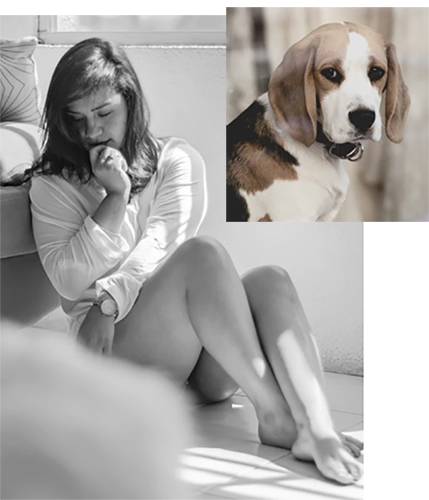
To stimulate your imagination and start drawing, look through photos to find an animal and person in a pose of interest.
To find two photo references, I visited Pixelbay.com.
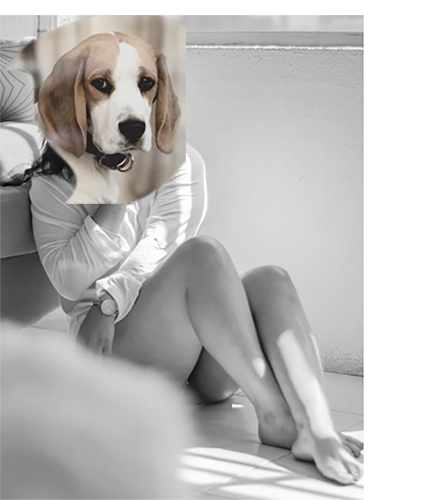
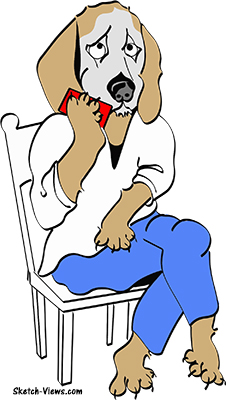
Next, I placed the dog’s head on the woman’s body. This can be done manually on paper via “cut-and-paste,” or through a computer art program, which is what I used.
Using the existing images, I manipulated the woman’s right hand to suggest she was holding a cell phone. Again, this type of manipulation can be done on paper or through a computer.
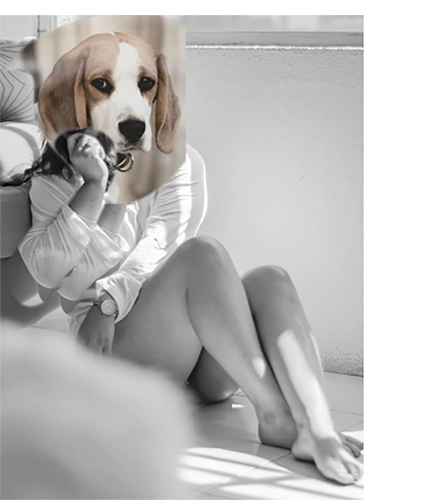
While my finished cartoon character didn’t faithfully reproduce the references, those references stimulated my imagination to produce the following image–a dog-like figure who is stuck on a boring phone call.
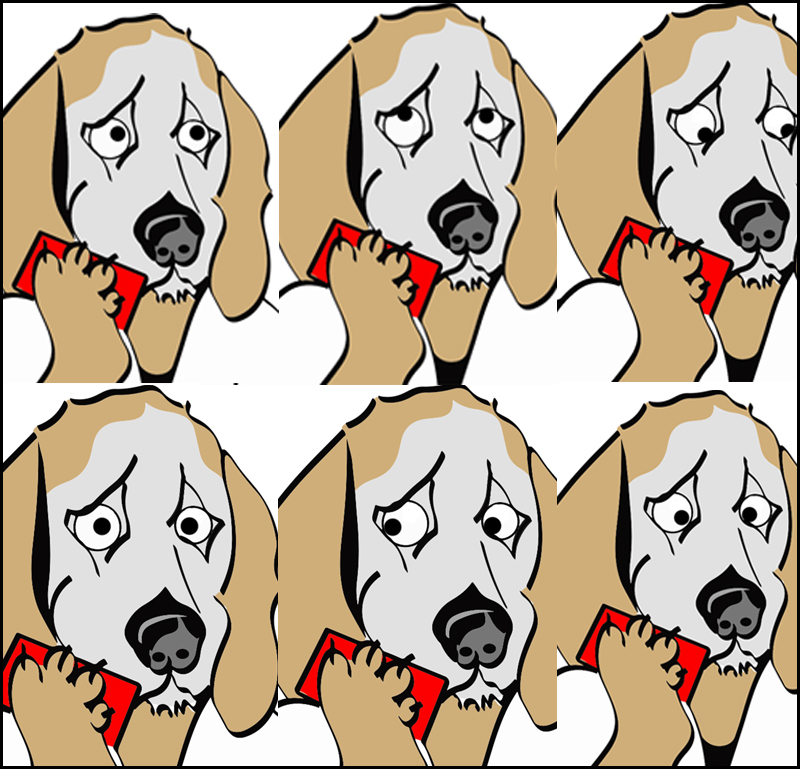
The secret to creating humorous cartoons is in conveying emotions through the eyes and eyebrows. Experiment by making a single cartoon figure, but without eyeballs and eyebrows, copy it, and then draw the eyeballs in each copy, but in different positions.
Links:
- Photo Resource: The photos are from Pixelbay.com, home of stunning, royalty-free images. The dog was contributed to Pixelbay by Marten Bjork, and the woman, Lenin Estrada.
- The appeal of graphic novels about anthropomorphized animals. By Christine Ro, April 2018. This article provides an excellent analysis about the use of anthropomorphized animals, plus examples of where they have been used.
- Drawing and Painting Imaginary Animals. By Carla Sonheim. I recommend buying the soft-bound copy.
- Cartoon Sketching: Identifying emotions. By Karen Little. Littleviews.com
- Steal Like an Artist: 10 Things Nobody Told You About Being Creative. By Austin Kleon. This book can change your life! I highly recommend it and other works by Austin Kleon.
Support:
Our mission is to help people learn how to sketch, love what they do, and share their sketches with others. Our mission is supported by our gift center on Sketch-Views.com, with products like the one you see at the bottom of this page. Would you like to have us create a custom illustration for you? Just ask!
Author:
This article was written by Karen Little as part of an ongoing series of blogs on Cartoon Sketching. Published on Littleviews.com. February 10, 2020.
Reproduction of this article is free to non-commercial websites (or other media) with permission and attributes to Littleviews.com and the article’s author.
All material on Littleviews (with noted exceptions) is copyrighted on the date of publication.
Questions? Ask Karen Little at karen@littleviews.com.